3D to 2D Asset Pipeline
This week, I jumped into the world of asset pipelines and built a Blender addon to generate UV sprites from 3D models.
What the Heck's a UV?
When we build a 3D model, we often want to overlay images on top of the model, adding color and texture to what is, by default, just a bunch of uncolored triangles. We use a technique called "UV Unwrapping" to do this. The creator of the 3D model can designate how the model should fold apart and place these folded down pieces on a 2D plane. You can think of it in the same way as a map of the globe. The map is a 2D representation of a 3D object.
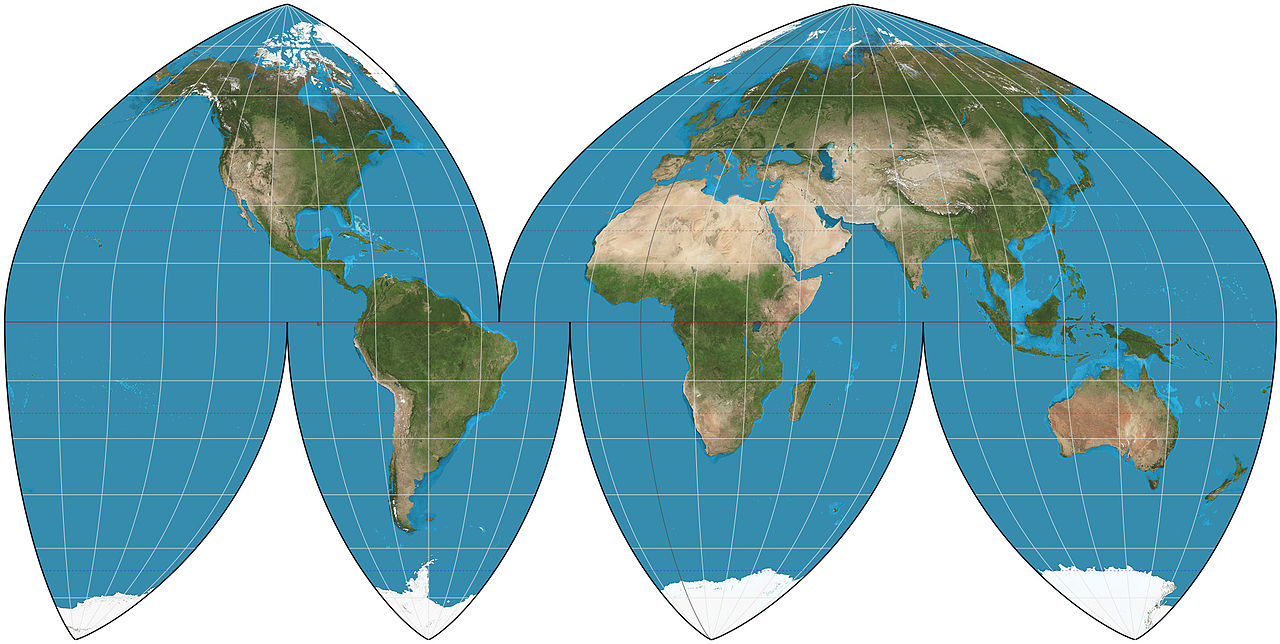 Boggs Eumorphic Projection of the Earth - By Strebe - Own work, CC BY-SA 4.0, https://commons.wikimedia.org/w/index.php?curid=35708409
Each vertex in the model is mapped to a position on an XY plane, with X and Y values ranging from 0 to 1. For example, a UV coordinate of (0, 0) sits in the bottom left of the plane, while a UV coordinate of (1, 1) sits in the top right. These values are usually kept as data on the model's vertices themselves. When rendering, the UV values for each vertex in a given triangle are interpolated across the triangle, giving us accurate UV values for each pixel we draw.
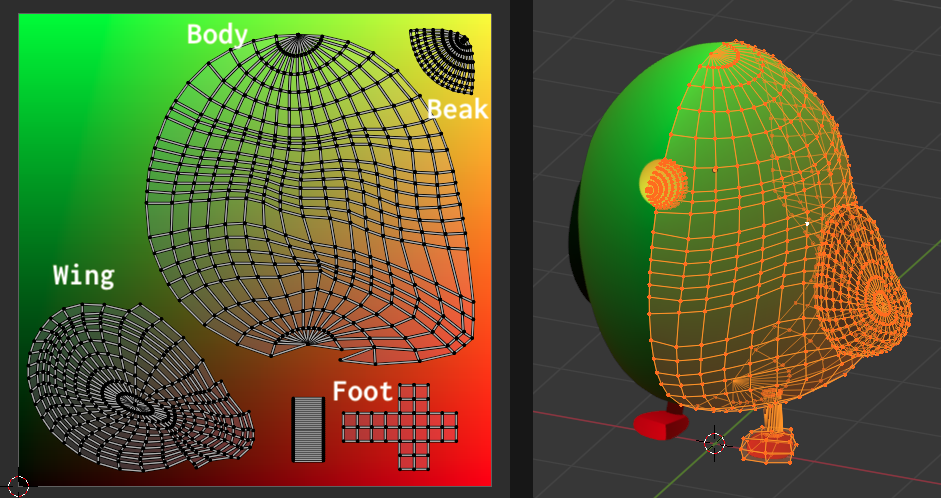 A UV Unwrapped Model, with labeled vertex groups
Above, the Model's UVs are mirrored across the X axis. The left side's UVs are "stacked" on top of the right side's, giving us UV symmetry and allowing us to save space in our textures
Each position on our model now has a 2D point that it can be mapped to. We can use this information to pull color and other data from 2D images and use this data when rendering our model. A single 3D model may have several of these images, called "textures", each providing specific information about attributes of the surface of the model. For example:
- Color/Albedo Texture: Holds information about the coloring of the model
- Normal Map: Normals are the vectors which point "out" from the surface of the model. We use normals when doing light calculations to determine which parts of the model are lit or in shadow. Normals maps usually provide significantly more detail than the geometry of the model itself, giving us higher fidelity textures which interact with light at almost no additional cost
- Ambient Occlusion (AO) Map: Ambient Occlusion creates soft shadows at creases in the model, giving it a more realistic look. The AO Map allows us to factor this occlusion into our lighting model without costly computation.
There are many more types of maps we could make, but they all function in the same way: They encode some information about the model's surface properties as a color. We use the model's UV coordinates to pick the correct value from the texture and use the value to help us when rendering.
Creating Sprites from a 3D Model
"Sprites" are just images, often containing some transparency information in the image's alpha channel. We use sprites to render environments, characters, and visual effects in 2D games. When we want to animate a sprite, we often collect several frames into a single image, called a "sprite sheet". Sprite sheets work like flip books, giving the illusion of motion by swapping which section of the sheet is being rendered at a specified frame rate.
This sprite sheet was found in a Reddit Post by its creator:
![]() A Sprite Sheet from Reddit
A Sprite Sheet from Reddit
Rendering sprite sheets from 3D modeling software is nothing new. The developers of Donkey Kong Country used the technique way back in 1994 to give their sprites a 3D look. More recently, the technique has been used in games like Hades and Dead Cells, where the effort of hand-drawing animations would be overwhelming. Instead, the objects are modeled in 3D software and "rigged", which allows the 3D models to be animated. Animations are created using the model and its rig, and then sprites are generated by framing the object and rendering out a set number of frames while the animation plays. These frames can then be collected into a sprite sheet and the animation can be played back in 2D.
The UV Sprite Concept
In a video on creating pixel art for his game, Astortion, aarthificial describes a technique for mapping each pixel in his hand-drawn sprites to a UV coordinate. This allows him to dynamically change the sprite's coloring at runtime, by swapping or modifying a texture.
I wanted try combining this technique with a 3D-to-2D workflow to create sprites from the model's UV coordinates. The resulting sprite animations could then be reused with different color textures to add variety.
Rendering a model's UV coordinates is easy, we can simply apply a material to the model which shows its UV coordinates as a color, where the X and Y values are rendered as red and green, respectively
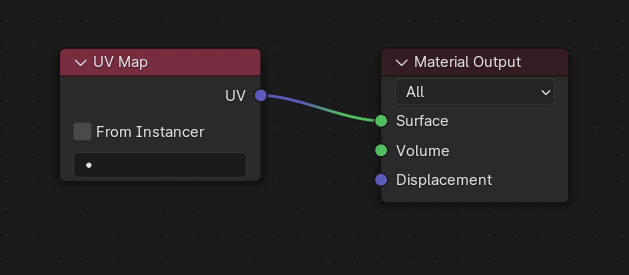 A Material which renders the model's UV coordinates as a color
A Note on Color Spaces
Color spaces are a complex topic, but the gist is that, when we render an image, the red, green, and blue color channels in the file are transformed to more accurately represent the way that humans see color.
Since we're rendering out UV coordinates and not color, we want to avoid these transformations when rendering. In Blender, this means setting the "View Transform" under Rendering/Color Management to "Raw".
Antialiasing Not Recommended
When we render a 3D model, the result often goes through several steps, each one slightly improving the image by antialiasing it to create smooth-looking edges, instead of hard, pixelated ones. In this case, we want to avoid antialiasing, as our UV data will get blended incorrectly. To avoid that issue, we only perform a single render step and leave the aliasing in. This means that the technique is a more natural fit for a pixelated art style, as any antialiasing would need to be performed on the sprite after mapping the UV coordinates to a color.
![]() A single render step, with aliasing but accurate UVs
A single render step, with aliasing but accurate UVs
![]() Multiple render steps, with incorrectly blended UVs
Multiple render steps, with incorrectly blended UVs
Writing a Blender Addon
Blender has a fairly extensive Python scripting toolset. We can write scripts to perform any action that we could perform with the user interface. Scripts can be packaged up as an "Addon", allowing us to extend Blender's functionality or set up scripted workflows by installing/enabling addons. There are Blender community addons for pretty much anything you'd want to do, but I wanted to get some experience writing my own.
The addon I wrote moves the scene camera to frame the object I have selected and renders out the object from several different angles. The resulting images can be turned into a sprite sheet or GIF of the object rotating.
Setting up the Camera
To achieve a consistent look from our renders, we need to ensure that each pixel in our resulting sprites represents the same distance in our scene. The addon calculates the bounding sphere of the object being rendered and re-positions the camera so that it's framing the sphere exactly. This isn't the most efficient way to pack the sprites, but it does guarantee that the object can be fully rotated in any direction and will remain in frame.
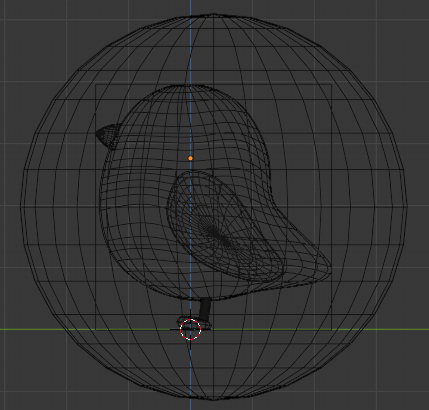 A Bounding Sphere
The size of the output image can then be calculated as the pixels-per-unit multiplied by the diameter of the bounding circle, rounded up to the nearest whole pixel:
resolution = math.ceil(
  pixels_per_unit *
  bounding_sphere_radius *
  2.0
)
This could be improved in lots of ways, but I was ok with this as a first pass, as it does give us consistent pixel sizing for our sprites.
A Matter of Perspective
There are two common projections used when rendering using a virtual camera: Perspective and Orthographic. Perspective cameras have, well... perspective. You can change the field-of-view (FOV) of a perspective projection change how wide the angle of the shot is.
Orthographic perspective has no FOV. Instead, the camera always shoots directly forward from the viewport. Using an orthographic projection means you lose out on a sense of depth, but you gain a better understanding of the object's volume from different angles. Almost all 2D (and some 3D) games use orthographic cameras for this reason, relying on techniques like parallax scrolling to give the illusion of depth. Instead of an FOV, orthographic cameras have a "scale", which represents the height of the camera's viewport in scene distance units.
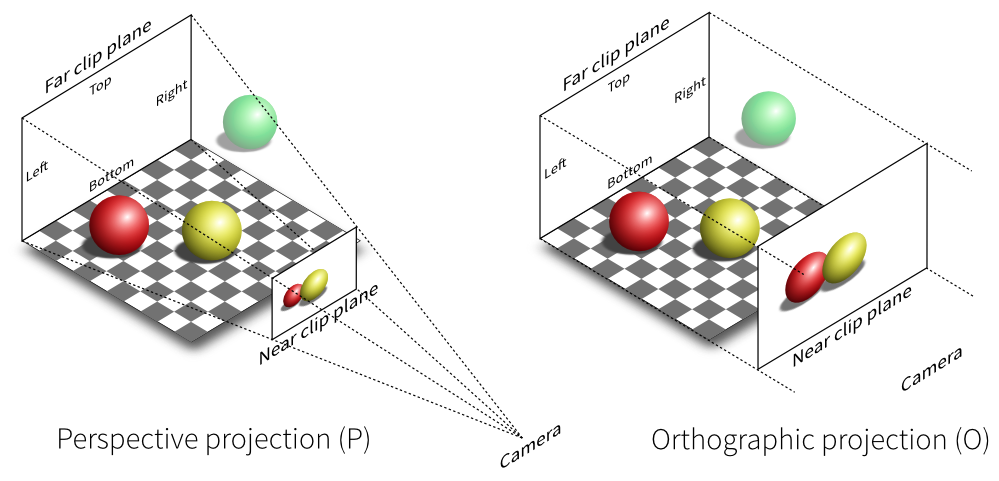 Perspective and Orthographic projections - https://www.quora.com/What-is-the-difference-between-orthographic-and-perspective-projections-in-engineering-drawing
For this project, I used an orthographic camera, setting the scale to the diameter of the target object's bounding sphere. We could use a perspective camera here, but the math would be a bit more complex.
Rendering from Code
Animations can be rendered out of Blender as an image sequence, but I chose to handle this myself from the code, as it provides more fine-grained control over the output image names and will allow me to control the animation frame rate more precisely in the future.
Results
The result of all this is a few images of the model from several angles. These images can be turned into a GIF of the object rotating, or collected into a sprite sheet, for use in a game engine or sprite rendering library like spritejs.
![]() A UV sprite sheet of a rotating bird
A UV sprite sheet of a rotating bird
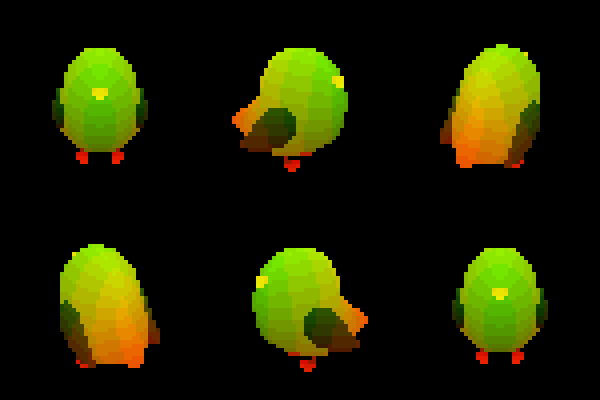 A gif made from the UV sprites
Wrapping Up
I learned a lot about UVs and Blender this week, but fell short of my original goal of ouputting complete sprite sheets, as the addon doesn't yet handle stepping through an animation or stitching together sprite sheets.
I spent a lot of time trying to figure out how to avoid blending UVs and writing shaders to test the viability of texturing the UV sprites during rendering, which mostly didn't make it into this post. I also learned quite a lot about Blender's Compositor, which lets us build repeatable pipelines for post-processing images.
In the future, I'd like to extend the addon to step through an animation and produce full sprite sheets of the animation from different perspectives. This could, for example, be used to create a single sprite sheet of an animation from 8 different directions, where the directions are the columns and the animation frames are the rows (or vice versa) for a top-down isometric game.
I'd also like to continue exploring how UV sprites could be used in games. For example, dynamically lighting sprites by baking the model's normals and using a UV sprite to look up the normal at render time.
I'm happy to have gotten a small taste of building asset pipelines and will definitely be building more of them in the future. See you next week!